Showing posts with label Bread. Show all posts

Wednesday, April 10, 2013

A Vist to Poilane in Paris

For most people travelling to Paris, France the itinerary would include all the iconic sites of Paris; the Eiffel Tower, a walk along the Seine, the Louvre, Notre-Dame, the Arc de Triomphe, a stroll along the Champs Elysees, and the many quaint Parigienne cafes, among others, but for me my trip would not have been complete without a visit to Poilane, the ever so famous panettiere.  The window display promised a delicious array of breads to choose from and window shopping the works of art they call bread would have been enough for some.


Those lovely boules that I'd seen many times in books and magazines with the famous P marking were right in front of me not to mention the incredible work of art of grapes and leaves on the boules next to them. I didn't buy one of the boules because they were so large and there was no suitable place to store so much bread at the hotel. Instead I bought smaller buns that the staff assured me was the same recipe and that would sate my craving for a taste of their wonderful bread.
The staff could see my enthusiasm and were only to willing to answer any questions I had for them.  As a matter of fact one woman who did not speak English very well went to the back to retrieve a baker with a better command of the English language. So much for all those stories you hear about how rude and aloof the French could be.  The people here were just lovely and accommodating as was the case with most of the people I encountered on my travels throughout Paris and the south of France.  In one bakery in the south after seeing my enthusiasm about bread baking the owner invited me and a friend to his small kitchen at the back of the store to show us where he made his bread and happily showed me a large pail of preferment in his refrigerator that would make the next day's batch.  He removed the lid so that we could smell the most beautiful dough and said "the dough does not smell strong, that is how is should be".  I would have gladly showed up the next day to work baking bread with him had he invited me.


I left with a selection of freshly baked breads that I would share with the group of friends I was traveling with.  I had come to Paris eager to visit Poilane and  the quaint shop and the wonderfully friendly staff there made the experience unforgettable.

Friday, March 8, 2013

Cranberry Nut Rolls


I'm afraid I haven't been a very good blogger for the last few months and I felt that perhaps it was high time I posted something and hopefully connect with some of my blogger friends. 

I suppose that another reason I haven't blogged lately is because I've taken a hiatis from bread baking.  I guess I was busy with other things and I figured it wouldn't be a bad thing to give my body a break from all that gluten that I love so much, and that is not to say that I've cut out bread altogether, because I haven't, but when I was baking bread on an almost daily basis you can just imagine how much of it I ate.

Anyway I made these a while ago and if I remember well they were quite good. They are chock full of cranberries and have a nice crunch from the walnuts and I would be quite happy to have these for breakfast anytime.  I found this recipe on Epicurious by Peter Reinhart.  I won't post the recipe here as it is very easy to find on the Epicurious site.  With Easter just around the corner these would make a nice addition to the breakfast table and I suspect they will go fast.

I hope you give them a try because I know you will not be disappointed.

Sunday, April 29, 2012

Pane di Noci - Walnut Bread


After running some errands, Randy and I decided that we would go out for pizza instead of going home to cook dinner. We wanted to try the newly opened pizza place on St. Clair Avenue with a rather interesting name of Pizza e Pazzi.  The direct translation to this is not Crazy for Pizza or Nuts for Pizza but Pizza and Crazies. Wow I thought, only the Italians with their romantic language can get away with a name like that. I imagined opening up a pizza joint and calling it Pizzas and Crazies and laughed thinking that no one would set foot in the place, yet Pizza e Pazzi constantly has lineups out the door.

Even though we were there for pizza, shortly after we were seated our server brought us a basket of assorted breads, which they informed us are baked daily on the premises. Randy chose a chiabatta bun and I opted for a slice of walnut bread. After smearing the bread with a pad of butter, I was quite pleased with my choice, and had that basket included a wheel of brie and some olives I could have easily called it dinner and left quite satisfied.

A few days later as I once again leafed through the Italian Baker by Carol Fields I happened to come across a recipe for Walnut Bread, and with the incredible slice I'd had at Pizza e Pazzi still fresh on my mind there was no doubt I would give this recipe a try.

I was quite happy that the recipe was for a straight dough method which meant I could get started right away.  The only extra step in this recipe was to toast the walnuts lightly. I was so happy that I didn't have to rub the skins off the walnuts, a step I loathe because as much as I rub I rarely get enough skins off.

The walnuts were added to the dough while it was mixing in the KitchenAid as opposed to adding the nuts by hand after the dough has been kneaded for awhile which made the whole process very easy.

After one rise I shaped it into a long log and joined the ends to form a ring.


After about 50 minutes in the oven you are rewarded with a very large ring worthy of oohs and aahs.

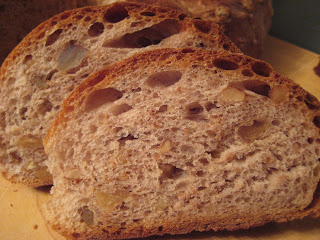
The difference between this bread and the bread I had at Pizza e Pazzi was that this bread's crumb was much darker as if it had been made with whole wheat flour. The darker crumb, however, comes entirely from the ground walnuts. And as far as taste I'd almost say that this one was better. It was especially good on its own with some butter. In her introduction Carol Fields wrote that Italians like eating this bread with soft fresh cheese but I thought it would also make great chicken sandwiches as well. With a ring as large as this one was I was able to have my fill and store some in the freezer. I highly recommend this bread and if you like nuts in your breads you'll go crazy for this one.


Pane di Noci - Walnut Bread


2 cups (200 grams) walnut pieces, plus 4 to 6 perfect halves for the ring mold.
2-1/2 tsp. active dry yeast (I used instant)
1/4 cup honey
1-1/3 cups warm water
2 tbsp. olive oil
3-3/4 cups (500 grams) unbleached all-purpose flour
1-1/2 tsp. salt

Toast the walnuts on a baking sheet in a 400 F. oven for 10 minutes.  Chop the walnuts to coarse crumbs with a sharp knife or in a food processor fitted with the steel blade.

Stir the yeast and honey into the water in a mixer bowl; let stand until foamy, abut 10 minutes.  Stir in the oil with the paddle. Add the flour, salt and walnuts and mix until the dough come together. Change to the dough hook and knead until soft, moist, and fairly dense. 4 to 5 minutes.  Knead briefly by hand on a lightly floured surface.

First Rise - Place the dough in an oiled bowl, cover tightly with plastic wrap, and let rise until doubled, about 1 -1/4 hours.

Shaping and Second Rise - Turn the dough out onto a lightly floured surface. Without punching it down or kneading it, shape in into a log and join the ends to make a ring.  Your may place the ring in an oiled ring mold with 4 to 6 walnut halves set in the bottom, so that when the bread is baked and turned out of the mold the nuts are on the top. The dough can also be baked in a free-form ring or round loaf. Place the free-form loaf on a floured peel or oiled baking sheet. Cover the dough with plastic wrap and let rise until doubled about 1 hour.

Baking- Heat the oven to 400 F. If you are using a baking stone, turn the oven on 30 minutes before baking and sprinkle the stone with cornmeal just before sliding the loaf onto it. (I used parchment paper on a cookie sheet). Bake for 10 minutes. Reduce the heat to 350 F.and bake 40 minutes longer. If you are baking the bread in a ring mold, bake the loaf out of the pan on a baking sheet or stone for the last 10 minutes to brown the bottom and sides. Cook completely on a rack.

Yeastspotted.

Monday, February 27, 2012

Spaccatini - Little Cleft Rolls


These little rolls from The Italian Baker by Carol Fields are probably my new favourite roll. At first I was wondering why these rolls from Lugano which is actually in Switzerland were featured in The Italian Baker, but upon further investigation I learned that this scenic and picturesque town on Lake Lugano on the Italian border also known as the "Monte Carlo of Switzerland" is the largest Italian speaking city outside of Italy. So having these fabulous rolls in the Italian Baker makes perfect sense.


I was attracted to the recipe for how easy it was to make. The night before I prepare a biga; a little flour, water and yeast mixed together and allowed to sit in a cool room overnight where it triples in volume.


In the morning I add this biga to more flour, yeast, water and salt and knead it to a smooth dough and set it in a greased bowl to rise.


In about a hour and a half the dough has come up to the top of the bowl and is ready for shaping. By the way may I mention here that this is one of the most velvety doughs I have ever worked with, to say that it feels like a baby's behind wouldn't be far off.

The recipe makes 16 rolls; I divided the dough into quarters then each quarter was divided into 4 pieces each weighing 55 grams.


The most time consuming part of making these little rolls is depressing a small dowel into each one to form a cleft. Now I suppose if you wanted to elimate this step, say because you were in a hurry, and just let the rolls rise and score with a knife no one would be the wiser. However if you did this just call them something else. I looked up the word spaccatini and found nothing, but the word "spaccare" is the verb for "to break or to split" so I am guessing that the little split in these rolls is where they got their name.


These are then placed top side down on a floured surface, covered with a towel or in my case plastic wrap and allowed to rise for about an hour or until they are doubled. I forgot to take a picture of the rolls on the parchment upside down and also of the rolls turned back cleft side up where I reemphasized the cleft by scoring the crease with a sharp knife.


They are baked in a 425 degree oven for about twenty minutes and when they are done you are rewarded with these crusty rolls with a lovely slightly chewy crumb. So whether you are Swiss or Italian I can't imagine that you would turn these down.

Yeastspotted.


Spaccatini – Little Cleft Rolls


Biga


Makes 2-1/3 cups (about 585 grams)
¼ teaspoon active dry yeast
¾ cup warm water
¾ cup plus 1 tablespoon plus 1 teaspoon water, room temperature
2-1/2 cups (about 350grams) unbleached all-purpose flour
Stir the yeast into the warm water and let stand until creamy, about 10 minutes. Stir in the remaining water and then the flour, 1 cup at a time.
Mix with a wooden spoon for 3 to 4 minutes or mix with the paddle attachment of the mixer at low speed for 2 minutes.
Remove to a lightly oiled bowl, cover with plastic wrap, and let rise at a cool room temperature for 6 to 24 hours. The starter will triple in volume and still be wet and sticky when ready. Cover and refrigerate until ready to use. When needed scoop out desired amount.

Dough


¾ teaspoon active dry yeast
½ cup warm water
2 cups (500 grams) Biga
About 2 cups (250 grams) unbleached all-purpose flour
1 teaspoon (5 grams) salt
Stir the yeast into the water in a mixer bowl; let stand until creamy, about 10 minutes. Add the starter and mix with the paddle until the starter is broken up. Add the flour and salt and mix until the dough comes together. Change to the dough hook and knead at low speed 2 minutes, then at medium speed 1 minute. If you want, finish kneading briefly by hand on a floured surface; you will probably need 1 to 2 tablespoons additional flour.
First Rise. Place the dough in a lightly oiled bowl cover tightly with plastic wrap, and let rise until doubled, 1-1/2 to 2 hours.
Shaping and Second Rise. Cut the dough into 16 pieces, each about the size of a lemon. Shape each piece into a ball on a floured surface; then, with the edge of your hand, a dowel, or the floured handle of a wooden spoon make a deep indentation down the center of each ball. Place the rolls cleft side down, on a well-floured surface. Cover with a towel and let rise until doubled, about 1 hour.
Baking. Heat the oven to 425 degrees F. Just before baking, turn each roll over and reemphasize the cleft. Place the rolls, cleft side up, on lightly oiled or parachment-lined baking sheet. Bake 20 to 25 minutes, spraying 3 times with water in the first 10 minutes. Cool on a rack.

Thursday, January 12, 2012

26% Whole Wheat Sandwich Bread with Seeds


I have never considered myself to be a wimp but it seems that I am. I found a recipe for Whole Wheat Sandwich Bread with only 50% whole wheat for those who prefer less whole wheat in their bread on Rose Levy Beranbaum's site which she describes as her new favourite sandwich bread. For those of us who prefer even less whole wheat in our bread she modified the recipe to 26% Whole Wheat Sandwich Bread and titled it Special for Whole Wheat Wimps and that would include wimpy old me. Really, there is nothing wimpy about this bread at all. In fact it is a wonderful sandwich bread that even with only 26% whole wheat it is elevated to a healthier version than plain old white bread. I then proceeded to up the ante for an even healthier bread by adding some seeds. This recipe with a small amount of old sourdough added to it produces a lovely to work with dough and baked in a 5 x 9 loaf pan you are rewarded with a large loaf of bread worthy of man sized sandwiches.


If your omit the old sourdough Rose instructs to bake the bread in a 4 x 8 loaf pan instead. I have to admit I prefer the smaller pan size for sandwiches so next time I make this and want to keep the old sourdough in the recipe I will just remove a small portion of dough and shape it into a roll and bake it together with the loaf.


If eating this bread makes me a wimp then I will proudly carry the label, and as I am sure there are many of you out there let us raise our hands in solitarity or better yet let us roll up our sleeves and bake this amazing bread.


Saturday, June 18, 2011

Alpine Baguettes - Alpler Baguette


These wonderful baguettes by Clemens Walch who has a bakery at the base of a ski slope in Lech in the beautiful Austrian Alps are so good that Daniel Leader included the recipe in his book Local Breads. I was drawn to this bread because of my favourite mixture of seeds in the dough, mainly sunflower, pumpkin, flax and sesame along with some rolled oats.

The seeds and rolled oats are soaked the night before to plump up and soften.


The recipe has a small amount of German rye sourdough which gives the bread a slight tang. Daniel Leader gives instruction for developing a rye sourdough culture but I have to admit that I cheated here. Making his rye sourdough culture from scratch would have meant waiting for almost two weeks to develop and I just didn't have the patience for that so I used my regular sourdough culture and refreshed it a couple of times with rye flour and water. By then there was enough rye flour in the culture that I was pretty confident that it would work as well.

The one problem I found in the recipe was the high hydration. The dough was quite wet and even after 15 minutes of mixing with the KitchenAid the gluten wasn't developing as I thought it should. I will confess that I ran out of bread flour and had to use unbleached flour so this may have caused the problem but I just added more flour along with a handful of rye flour and the dough came together just fine. It still had to be poured out of the mixer into a rising container but after a two hour rise it was manageable on a well floured surface. Next time I'll try decreasing the amount of water used to soaked the seeds and oats. I preshaped the divided dough by folding rectangles of dough into thirds and allowed them to rest covered for 10 minutes.

After the rest they were easily shaped into long baguettes, covered and allowed to rise for another 40 minutes or until they looked puffy and light.

They baked up beautifully and they crackled nicely when they were removed from the oven, a sign that they were ready.

This recipe is definately a keeper, as a matter of fact I now keep a rye culture in my fridge along with the regular sourdough culture.

The crumb is lovely and toothsome with a nice crisp crust. The only complaint I had with this bread was that there was not enough salt for my taste, so next time I'll have to remember to add a bit more salt and it will be perfect. I really like this bread alot.

Alpine Baguettes

Yield: 3 thick baguettes, ~12 inches long (368 g each)
Ingredients:


100 g mature, 100% hydration rye sourdough
28 g rolled oats
28 g sunflower seeds
28 g pumpkin seeds
28 g flax seeds
28 g sesame seeds
525 g water, divided
5 g instant yeast
500 g unbleached bread flour
10 g sea salt
Refresh the rye sourdough 12 to 24 hours before mixing. Also, pour the rolled oats and seeds into a bowl and cover them with 175 g water. Soak them overnight, so that they swell and soften.

When you are ready to mix the final dough, pour the remaining 350 g water into a large mixing bowl. Stir in the yeast, bread flour, soaked oasts and seeds, and salt with a rubber spatula. Stir down the rye sourdough and add it to the mixture. Stir well to combine.

Use the dough hook and mix the dough on medium-low speed (3 on a KitchenAid mixer) for 8 minutes. Turn off the machine and scrape the hook and the sides of the bowl. Drape a piece of plastic wrap over the dough and let it rest in the bowl for 10 minutes. Turn the mixer back on to medium-low and knead until the dough is smooth, silky, and elastic 5 to 7 minutes more.

Transfer the dough to an oiled container. Cover it and let is rise until it has doubled in volume (2 to 2 1/2 hours).

An hour before baking preheat the oven to 450 F with a baking stone and steam pan.

Divide the dough into three equal pieces. Flatten one piece of dough into a rectangle and fold it into thirds like a business letter. Turn it smooth side up. Repeat this process with the other two pieces. Cover the piece lightly and let rest on the counter for 10 minutes.

Shape the pieces of dough into a baguette about 12 inches long and 2 inches wide. Dust a piece of parchment paper with flour and place the baguettes on it, seam side down, about three inches apart. Cover lightly. Proof the baguettes at room temperature until they are puffy and light, 30-40 minutes.

Slide the baguettes into the oven. Bake them with steam for 10-15 minutes and without steam for another 10-15. Turn the oven off and leave the baguettes in for another 5-10 minutes. Let the loaves cool for at least 30 minutes on a wire rack. These are delicious enjoyed warm.

Tuesday, March 29, 2011

Basic Hearth Bread - Multi Grain Version


I hadn't made a multi grain bread in a while and I thought it was high time to whip up a few loaves, one for now and a couple for the freezer for a later date or to give away. I turned to a favourite recipe that I found on Rose Levy Beranbaum's site a while ago and that I have made several times. This recipe appears on Harvest King Flour bags but the recipe on her site has extra tips and variations which you can find here http://www.realbakingwithrose.com/2006/11/harvest_king_flour_tips_and_re.html.


I increased the recipe by 50% so that I could have the extra loaves. For the grains I added 10-grain cereal mix, sunflower and pumpkin seeds, sesame seeds and flax seeds that I purchased at the bulk food store. Although the recipe did not specify to soak the grains, I did by mixing a half cup of warm water and the grains (not the seeds) in a bowl and let them sit for about half an hour. I just had to decrease the water in the recipe by half a cup and proceed with the recipe. The dough mixes up beautifully and looks lovely speckled with all the healthy grains and seeds. My machine struggled a bit because of the extra dough but it managed to mix for the specified time of seven minutes.


After two risings I divided the dough and decided to shape them in long free form loaves each weighing about 440 grams.


The kitchen was cool so they doubled in about an hour and a half and then they were ready for the hot 450 F. oven. I sprayed them with water and threw in some ice cubes on the cast iron tray on the floor of my oven for steam. After ten minutes I lowered the oven to 425 F. and continued baking for another 25 minutes.

They baked up beautifully golden and after removing them from the oven they crackled so I knew they were done. I allowed them to cool for about an hour before having a slice with butter.


This bread is really good and I can hardly wait for breakfast to have a couple of slices with jam.

Yeastspotted.

Saturday, January 29, 2011

French Country Boule


I'm afraid I collect cookbooks like some women collect shoes. That might not be the best analogy in my case but you get the point. I cannot resist buying cookbooks and should that cookbook be on bread promising an artisan type loaf or even better a glorious fruited bread out of your own oven, well then I'm sunk, hook, line and sinker. Sometimes I will buy several books at the same time and as much as I try to bake something from all of them, one or two will inadvertantly end up on the book shelf unused until I am inspired to try something new. So for this bread I turned to Local Breads by Daniel Leader, a first from this book. Flipping through the pages I came across a recipe for French Country Boule (Pain de campagne) that sounded pretty good to me. You certainly can't go wrong with a bread made from a sourdough culture and with my trusty culture in the refrigerator waiting for expansion I was well on my way.


The night before I added some water and flour to the liquid soughdough culture and by morning it had doubled.

The dough has some whole wheat and rye flours as well as A/P flour and mixed up to a lovely dough. It is a fairly soft and tacky dough so it needs a banneton to support it in its final rise. The recipe makes two boules and I only have one banneton so I improvised by using a bowl lined with a clean cotton towel. The banneton and towel lined bowl have to be heavily dusted with flour to ensure that the dough doesn't stick and I have to admit I always fret about this step as I have had stubborn fully risen doughs that have not pulled away without some persistant coaxing. I'm always afraid that I will be left with a completely deflated loaf.


But this was not the case with this particular bread and they both came out of their molds without a hitch. Of course I had flour flying all over the place but at least my boules were intact. Scoring the bread wasn't easy - either my serrated knife wasn't sharp enough or the dough was too soft and I think I'll blame the latter. In any case I managed to score each bread differently mostly because the criss cross design took some doing so I opted for a more straight forward slash for the second boule.

After baking the boules in a 400 F. oven for about 25 minutes they were done. I thought they looked pretty good. After cooling I just had to have a taste and I was not disappointed at all. The bread is quite springy with a very nice crumb so a sharp serrated knife to slice through easily is key. I certainly would make this bread again. Mr. Leader you make good bread.
On the very day that I baked these boules a package was delivered to my door. I wonder what it could be. It was too thin to be from Zappos.


As I mentioned I'm a real sucker for bread cookbooks and when I read about this one I just had to order it.
French Country Bread
Pain de champagne

Liquid Levain Starter

50 grams liquid levain
175 grams Water, tepid
135 grams Unbleached all-purpose flour

Pour the liquid levain ito a small bowl. Pour in the water and stir with a rubber spatula. The levain will froth. Mix in the flour until the mixture is fairly smooth, scraping down the sides of the bowl. Cover with plastic wrap and let stand at room temperature for 8 to 12 hours. When ready, it will have expanded by about one third and the surface will be bubbly, like a large pancake ready to be flipped. It will have a wheaty fruity, mildly tangy aroma.

Bread Dough

250 grams Water, tepid (70 to 78 degrees)
440 grams Unbleached all-purpose flour
30 grams Stone-ground whole wheat flour
30 grams Fine or medium rye flour
310 grams Liquid levain starter
10 grams Sea salt

Pour the water into a large mixing bowl of a stand mixer. Add the bread flour, whole wheat flour, and rye flour and stir with a rubber spatula just until it absorbs all the water and a rough dough forms. Cover with plastic wrap and let stand at room temperature for 20 minutes to hydrate the flour and give the gluten a chance to develop on its own.
Add the Levain in and Salt. Stir the levain with the spatula to invigorate and deflate it. Scrape it into the bowl of dough. Sprinkle the salt over the dough. Use the spatula to blend the levain and salt into the dough.
Use the dough hook and mix the dough on medium speed (4 on a KitchenAid mixer) until it is smooth, 8 to 9 minutes. It will be soft and tacky but will clean the sides of the bowl.
Ferment the Dough. Transfer the dough to a lightly oiled, clear, straight-sided 2-quart container with a lid. With masking tape, mark the spot on the container that the dough will reach when it has doubled in volume. Cover and leave it to rise at room temperature (70 to 75 degrees) until it inflates into a dome and reaches the masking tape, 2-½ to 3-1/2 hours. It will feel springy and less sticky.
Divide and shape the boules. Heavily dust the bannetons or two bowls lined with kitchen towels with flour. Lightly dust he counter with flour. Scrape the dough onto the counter. With a bench scraper or chef’s knife, cut the dough into 2 equal pieces (560 grams each). Shape each piece into a boule. If you don’t achieve a perfect round, leave it. It’s important not to overwork the dough. Place each round, smooth side down, in a prepared banneton or bowl. Lightly sprinkle with flour and cover loosely with plastic wrap.
Proof the boules. Let the boules stand at room temperature until they become pillowy and nearly double in size, 1 to 1-1/2 hours. When you press your fingertip into the dough, the indentation will spring back slowly.
Prepare the oven. About 1 hour before baking, place a baking stone on the middle rack of the oven and cast-iron skillet on the lower rack. Heat the oven to 450 degrees.
Score the Boules. Lightly flour a baker’s peel or rimless baking sheet. Uncover the loaves and tip them out onto the peel or sheet, guiding them fro a soft landing and arranging them at least 2 inches apart. With a lame, a single-edged razor blade, or a serrated knife, make 3 parallel slashes centered on each loaf, each about ½ inch deep.
Bake the boules. Slide the loaves, still on the parchment, onto the baking stone. Place ½ cup of ice cubes in the skillet to produce steam. Bake for 15 minutes. Reduce the heat to 400 degrees and continue to bake until the boules are red-brown, 20 to 25 minutes.
Cool and store the boules. Slide the peel or the rimless baking sheet under the parchment paper to remove the loaves from the oven. Slide the loaves still on the parchment, onto a wire rack. Cook the loaves completely, about 1 hour before slicing. Store the cooled loaves in a brown paper bag. They will stay fresh for about 4 days. For longer storage, freeze in resealable plastic bags for up to 1 month.